
Genesys Cloud Contact Center
This guide connects a Genesys Cloud contact center to Live Hub. Complete the following steps:
- Add BYOC Cloud or Genesys Cloud Voice.
- Add an External Trunk to the Genesys Cloud account.
- Create a SIP connection in Live Hub.
- Update the Outbound configuration of the External Trunk in the Genesys Cloud account.
- Create an Outbound Rule for routing calls through the External Trunk in the Genesys Cloud account.
Once these steps are complete, you can also connect Genesys Cloud to a bot framework.
Add BYOC Cloud or Genesys Cloud Voice
To add BYOC Cloud or Genesys Cloud Voice to your subscription:
- Log in to Genesys AppFoundry as a user with Organization Admin privileges.
- Search for the cloud telephony connection option you want to add, for example BYOC.
- Click the card, and then follow the instructions.
While Genesys Cloud sets up your service and updates your billing, a progress spinner appears. When the process is complete, your new service is ready to use.
For more information, see About BYOC Cloud or About Genesys Cloud Voice.
Add an External Trunk to the Genesys Cloud account
To add the External Trunk that represents Live Hub to your Genesys Cloud account:
-
Log in to Genesys Cloud as a user with Telephony Admin privileges.
-
In the top-level menu, select Admin.
-
Under 'Telephony', select Trunks.
-
Click Create New.
-
For 'External Trunk Name', enter the name of the External Trunk, for example AudioCodes Live Hub.
-
For 'Type', select BYOC Carrier, and then Generic BYOC Carrier. The detailed trunk configuration settings appear.
-
For 'Protocol', select TLS.
-
Under 'Inbound / Termination', for 'Inbound SIP Termination Identifier', enter a unique alphanumeric string that identifies the trunk, for example
audctrk. -
Once you enter the value, the Inbound Request-URI Reference section appears.
The section displays the 'FQDN Method' value. Copy the hostname part of it for use when you configure Live Hub. For example, if the 'FQDN Method' value is
INVITE sip:+xxxxxxxxx@audctrk.byoc.usw2.pure.cloud, the hostname part isaudctrk.byoc.usw2.pure.cloud. -
Configure Digest Authentication:
- Change 'Digest Authentication' to Enabled.
- In the 'Realm' field, enter
DefaultSipRealm. - In the 'Username' and 'Password' fields, enter the credentials that authenticate outbound traffic from the Genesys Cloud account to Live Hub. Copy the configured credentials for use when you configure Live Hub.
-
Under Calling:
- For 'Address Override Method', select Unassigned DID. This preserves the caller ID while the call is transferred from the Genesys Cloud account to Live Hub.
- For 'Caller ID', enter the E.164 number to use when the caller ID is unknown, for
example
+34910603165.
-
Under 'External Trunk Configuration', click Identity to show the identity configuration screen, and then:
- Under 'Calling', change 'Address Omit + Prefix' to Disabled.
- Under 'Called', change 'Address Omit + Prefix' to Disabled.
-
Under 'External Trunk Configuration', click Protocol to show the protocol configuration screen, and then:
- Under 'Header / Invite', change 'Conversation Headers' to Enabled. Genesys
Cloud then attaches
conversation-idas a custom SIP header in the outgoing messages. - Under 'User to User Information (UUI)', change 'UUI Passthrough' to Enabled. Keep 'Type' set to User-to-User and set 'Encoding Format' to Ascii. Genesys Cloud can then pass additional information.
- Under 'Take Back and Transfer', change 'Enable Take Back and Transfer' to Enabled. Genesys Cloud then supports call transfer.
- Under 'Header / Invite', change 'Conversation Headers' to Enabled. Genesys
Cloud then attaches
-
Click Save External Trunk to save the new trunk.
Create a SIP connection in Live Hub
To create the SIP connection that represents the Genesys Cloud account:
-
Log in to Live Hub.
-
In the Navigation pane, select SIP connections, and then click Add new SIP connection.
-
Select the General tab:
-
Under General:
- In the 'Name' field, enter a unique SIP connection name (for example, Genesys Cloud).
- From the 'Provider type' drop-down list, select Contact Center.
- From the 'Provider' drop-down list, select Genesys Cloud.
-
Under Security:
- From the 'Encryption' drop-down list, select Enabled.
-
Under Registration and authentication:
- Under Credentials, enter the
{username}and{password}that you configured under Digest Authentication in the Genesys Cloud account's External Trunk configuration.
- Under Credentials, enter the
-
-
Select the Incoming tab:
-
Under Authentication:
- Select the 'FQDN (Request-URI)' check box, and then copy the 'SIP connection FQDN' value that appears. You use this value to update the Outbound configuration of the External Trunk in the Genesys Cloud account.
- Select the 'Source IP address' check box.
- Select the 'Credentials' check box, and then enter the same credentials that you configured on the General tab. These credentials are also configured in the Genesys Cloud account's External Trunk configuration, under Digest Authentication.
-
-
Select the Outgoing tab:
-
Under Outgoing:
- In the 'SIP server hostname' field, enter the full Genesys FQDN, for example
audctrk.byoc.usw2.pure.cloud.
- In the 'SIP server hostname' field, enter the full Genesys FQDN, for example
-
Under Addresses:
- Click Add to create a new entry.
- For 'ADDRESS', enter the hostname part of the 'FQDN Method' value shown in the
Inbound Request-URI Reference section of the External Trunk configuration
screen in the Genesys Cloud account, for example
audctrk.byoc.usw2.pure.cloud. - For 'PORT', enter
5061. - For 'PROTOCOL', select TLS.
-
-
Select the Info tab.
Under ADDRESSES, copy the 'ADDRESS' value from the row where 'TYPE' is Signaling and 'PROTOCOL' is tls. That value is the 'Signaling IP Address' of the SIP connection. You need it to update the SIP Access Control configuration of the External Trunk in the Genesys Cloud account.
-
Click Create.
Update the Outbound configuration of the External Trunk in the Genesys Cloud account
To update the Outbound configuration of the External Trunk with the FQDN of the SIP connection in Live Hub:
-
Log in to Genesys Cloud as a user with Telephony Admin privileges.
-
In the top-level menu, select Admin.
-
Under 'Telephony', select Trunks.
-
Select the trunk that you created earlier.
-
Under 'Outbound for SIP Servers or Proxies', update the placeholder entry that you created earlier.
- Remove the placeholder entry, the one with IP address
127.0.0.1. - For 'Hostname or IP Address', enter the 'SIP connection FQDN' value shown on the Incoming tab of the SIP connection in Live Hub.
- For 'Port', enter
5061. - Click plus to add the entry.
- Remove the placeholder entry, the one with IP address
-
Under 'SIP Access Control':
- For 'Allow the Following Addresses', enter the 'Signaling IP Address' value of the SIP connection, as shown on the Info tab of the SIP connection in Live Hub.
-
Click Save External Trunk to save the updated configuration.
Create an Outbound Rule for routing calls through the External Trunk in the Genesys Cloud account
To create the Outbound Rule that routes calls through the External Trunk created in the previous step:
-
Log in to Genesys Cloud as a user with Telephony Admin privileges.
-
In the top-level menu, select Admin.
-
Under 'Telephony', select Sites.
-
Select the site that you want to modify.
-
Select the Outbound Routes tab.
-
For the Default Outbound Rule:
- Under 'External Trunks', select the External Trunk that you created earlier.
-
Click Save Outbound Rules to save the updated configuration.
This routing configuration is the simplest one. You can instead add a dedicated Number Plan to match specific DID numbers. For a more detailed description, refer to the BYOC Cloud Quick Start Guide.
Connect Genesys Cloud to a bot framework
Once the generic configuration is complete, you can connect Genesys Cloud to a bot framework.
There are several ways to connect a bot framework to your contact center flows. The methods described here anchor calls on the contact center, so that you keep the existing contact center functionality in place and complement it with the functionality that voice bots and conversational IVRs provide.
Call flow to the bot
The following diagram shows a typical call flow for a call sent to the bot.
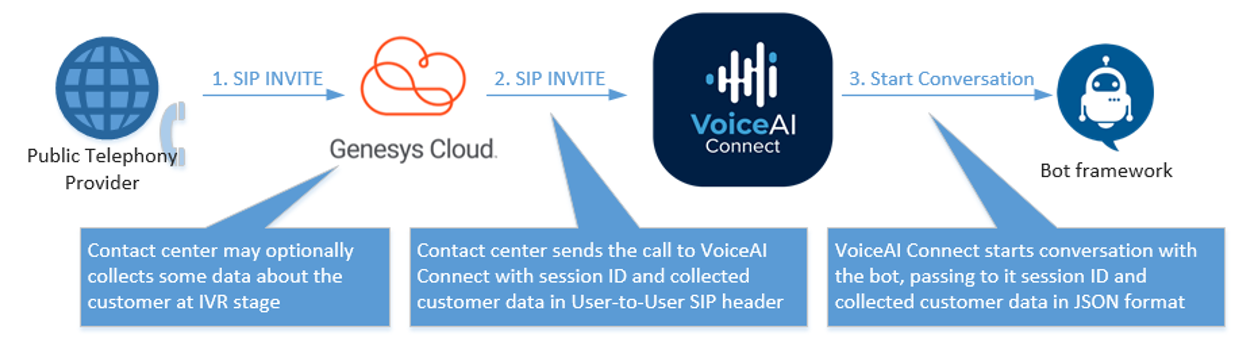
The Genesys Cloud contact center receives the call from the customer.
The contact center can optionally collect data about the customer at the IVR stage: a personal ID and a credit card number, for example.
It then routes the call to Live Hub, which is configured in Genesys Cloud as a BYOC External SIP Trunk. Session context, meaning the session ID and the collected customer data, is shared through the following SIP headers:
x-inin-cnv— contains the session ID.User-to-User— contains the collected customer data. The value is formatted according to RFC 7433 and starts with a two-digit protocol discriminator,00in the following example.
For example:
INVITE sip:+1222xxxx@xxxxx.vaic-sip1.audiocodes.io SIP/2.0

From: <sip:+1222xxxx@mytrunk.byoc.usw2.pure.cloud>;tag=1c1041548688

To: <sip:+1222xxx@xxxxx.vaic-sip1.audiocodes.io>

User-to-User: 00{ "personalId": "555", "creditCard": "xxx" };encoding=ascii;
purpose=isdn-uui;content=isdn-uui

X-inin-cnv: e21b897e-c0a9-40d1-xxxx-xxxxxxxxx
Configure Live Hub to pass the shared session context to the bot framework:
-
Log in to Live Hub.
-
In the Navigation pane, select Bot connections.
-
Select your bot, and then click Edit.
-
On the Settings tab, under SIP headers to bot:
-
Click Add to add a new entry, and then configure it as follows:
- For 'SIP HEADER', enter
User-to-User. - For 'BOT PARAMETER', enter the name of the parameter to send to the bot, for
example
customerData.
- For 'SIP HEADER', enter
-
Click Add to add another entry, and then configure it as follows:
- For 'SIP HEADER', enter
x-inin-cnv. - For 'BOT PARAMETER', enter the name of the parameter to send to the bot, for
example
sessionID.
- For 'SIP HEADER', enter
-
-
Click Update to apply the changes.
Live Hub starts a conversation with the bot by sending a start message. The session context is passed according to this configuration.
For example:
{
    "activities": [
        {
            "id": "5790741f-8068-4a9c-xxxx-xxxxxx",
             "name": "start",
             "parameters": {
                 "callee"; "+1222xxxx",
                 "caller"; "+#1222xxxx",
                 "customerData": "00{ \"personalId\": \"555\", \"creditCard\": \"xxx\" }; encoding=ascii; purpose=isdn-uui; content=isdn-uui",
                 "sessionID": "e21b897e-c0a9-40d1-xxxx-xxxxxxxxx",
...
            },
            "timestamp": "2022-91-03T09:12:59.972Z",
             "type": "event"
        }
    ],
    "conversation": "6927fd37-d866-4553 -xxxxx-xxxxxxx"
}
The bot implementation can use the session context to tailor the user experience to the specific customer.
Call transfer from the bot to a human agent
The following diagram shows a typical call flow for a call transferred from the bot to the human agent.
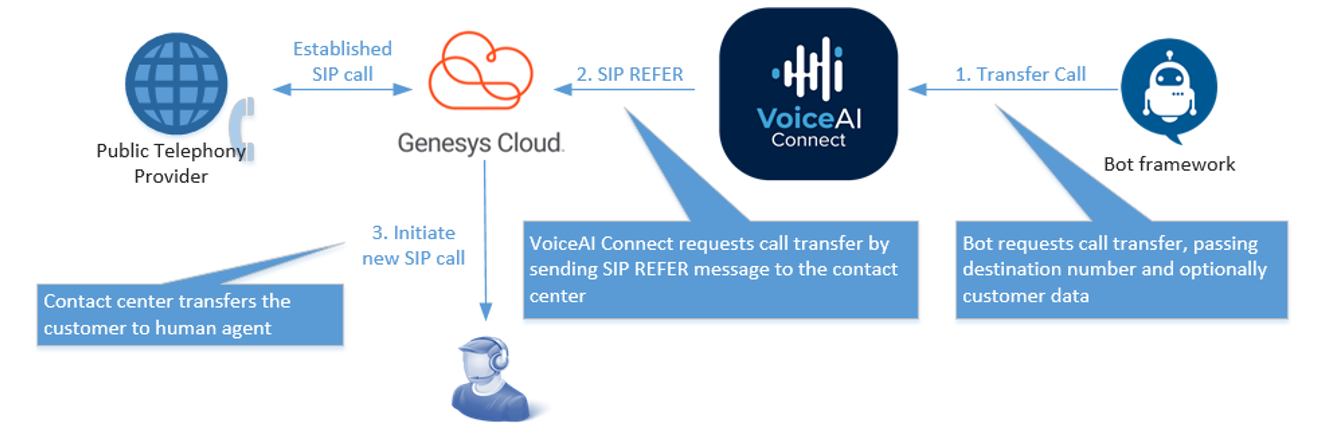
Transfer to a human agent is a common use case: the bot decides that it can no longer handle the call and requests a transfer to a human agent. This may happen, for example, if the bot detects abnormal user behavior, or when a customer explicitly asks to speak to a human.
The bot initiates the transfer by sending a transfer message.
For example:
[
    {
        "activityParams": {
            "transferTarget": "tel:+1222xxxx"
        }
        "id": "b7940@215-d2bb-493e-xxxx-xxxxxxxx",
        "name": "transfer",
        "timestamp": "2022-01-03T09:13:09.839Z",
        "type": "event"
    }
]
A bot can optionally provide session context to the contact center by constructing a
User-to-User header in accordance with RFC 7433, starting with a two-digit protocol
discriminator such as 00, and including it in the message's transferSipHeaders
element.
For example:
[
    {
        "activityParams": {
            "transferTarget": "tel:+1222xxxx",
            "transferSipHeaders": [
                "name": "User-to-User",
                "value": "00{ \"personalId\": \"555\"}"
            ]
        }
        "id": "b7940215-d2bb-493e-xxxx-xxxxxxxx",
        "name": "transfer",
        "timestamp": "2022-01-03T09:13:09.839Z",
        "type": "event"
    }
]
Live Hub performs the transfer by issuing a SIP REFER message toward Genesys Cloud. It
puts the agent's number in the Refer-To header, and the session context, if the bot
provided one, in the User-to-User header.
Genesys Cloud transfers the customer to a human agent. Once the transfer completes successfully, the call with Live Hub is disconnected.